Qt5 GUI on Intel Edison

If you want to create a graphical user interface (GUI) for the Intel Edison, it’s better to use the popular Qt cross-platform framework.
Then you will be able to develop and debug a program on your powerful desktop computer and then deploy it to your Edison and test it there.

My hardware and Linux kernel configuration

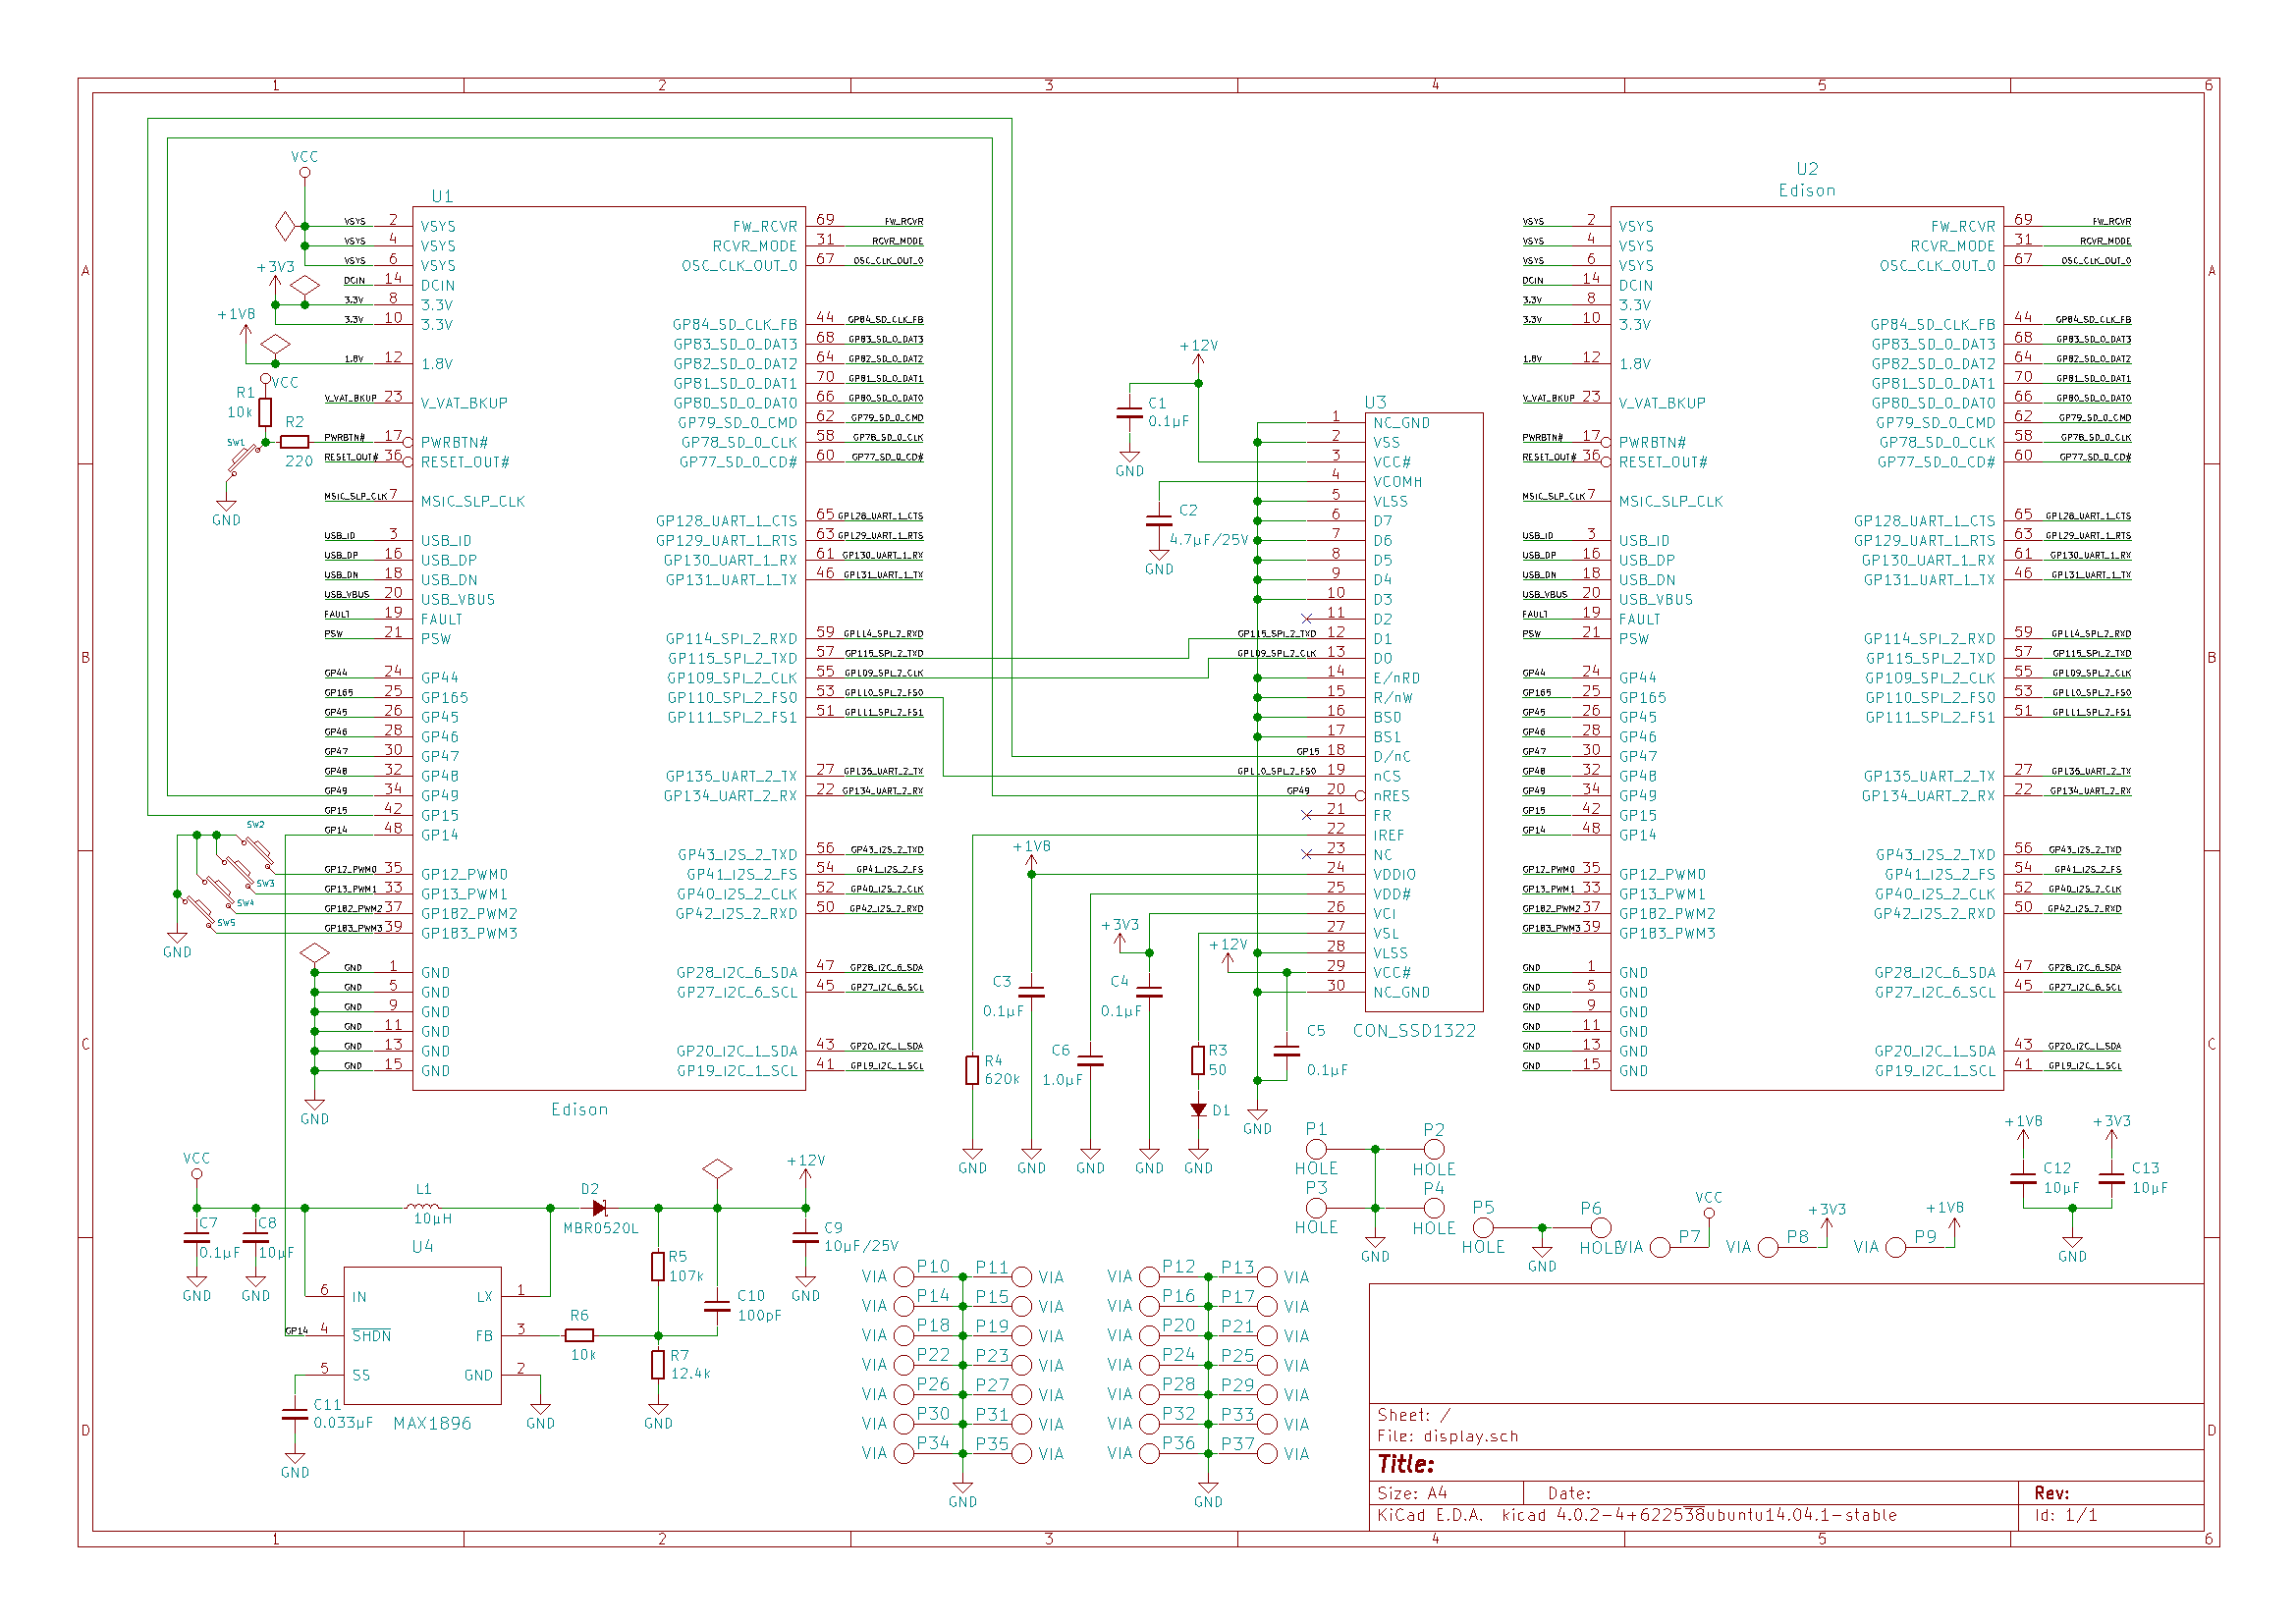
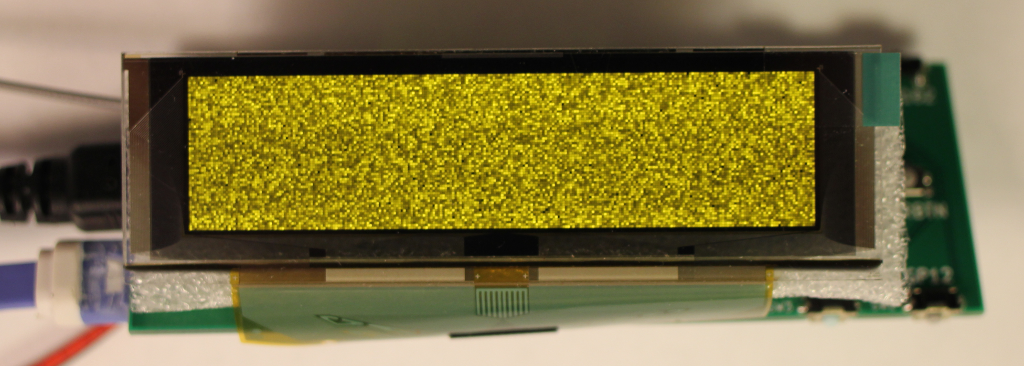
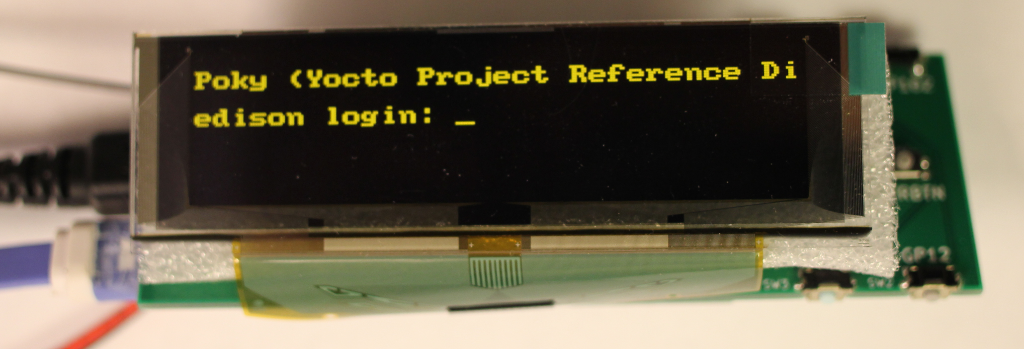
I used my shield that has a SSD1322 based display connected to the SPI bus and 4 push buttons connected to GPIOs.
The display is controlled through the Linux framebuffer kernel module fbtft.
The buttons are controlled through the gpio-keys module.

QT5 Yocto Client package installation

My Edison source packages are located in the folder ~/edison.

I increased the size of my root Edison partition in the file ~/edison/poky/meta-intel-edison/meta-intel-edison-distro/recipes-core/images/edison-image.bb

IMAGE_ROOTFS_SIZE = "1048576"

I downloaded a new meta package meta-qt5.
At the time of writing, the Intel Edison packages used the openembedded branch called “dizzy”.

cd ~/edison/poky
git clone -b dizzy https://github.com/meta-qt5/meta-qt5.git

I modified the configuration file ~/edison/build_edison/conf/auto.conf
I added some Qt packages and enabled some configuration options. I may select something else in the future.

The Intel Edison has no GPU. So, the Qt OpenGL based modules don’t work. Among them are Qt Quick and Qt Declarative and the packages that depend on these two.

DISTRO = "poky-edison"
MACHINE = "edison"
DISTRO_FEATURES_append = " alsa bluetooth x11"
PACKAGE_CLASSES = "package_ipk"
BB_DANGLINGAPPENDS_WARNONLY = "1"
EDISONREPO_TOP_DIR = "${TOPDIR}/../poky"

IMAGE_INSTALL_append = " tinyb"
IMAGE_INSTALL_append = " tinyb-dev"
#IMAGE_INSTALL_append = " openzwave"
IMAGE_INSTALL_append = " bacnet-stack"
IMAGE_INSTALL_append = " libmodbus"
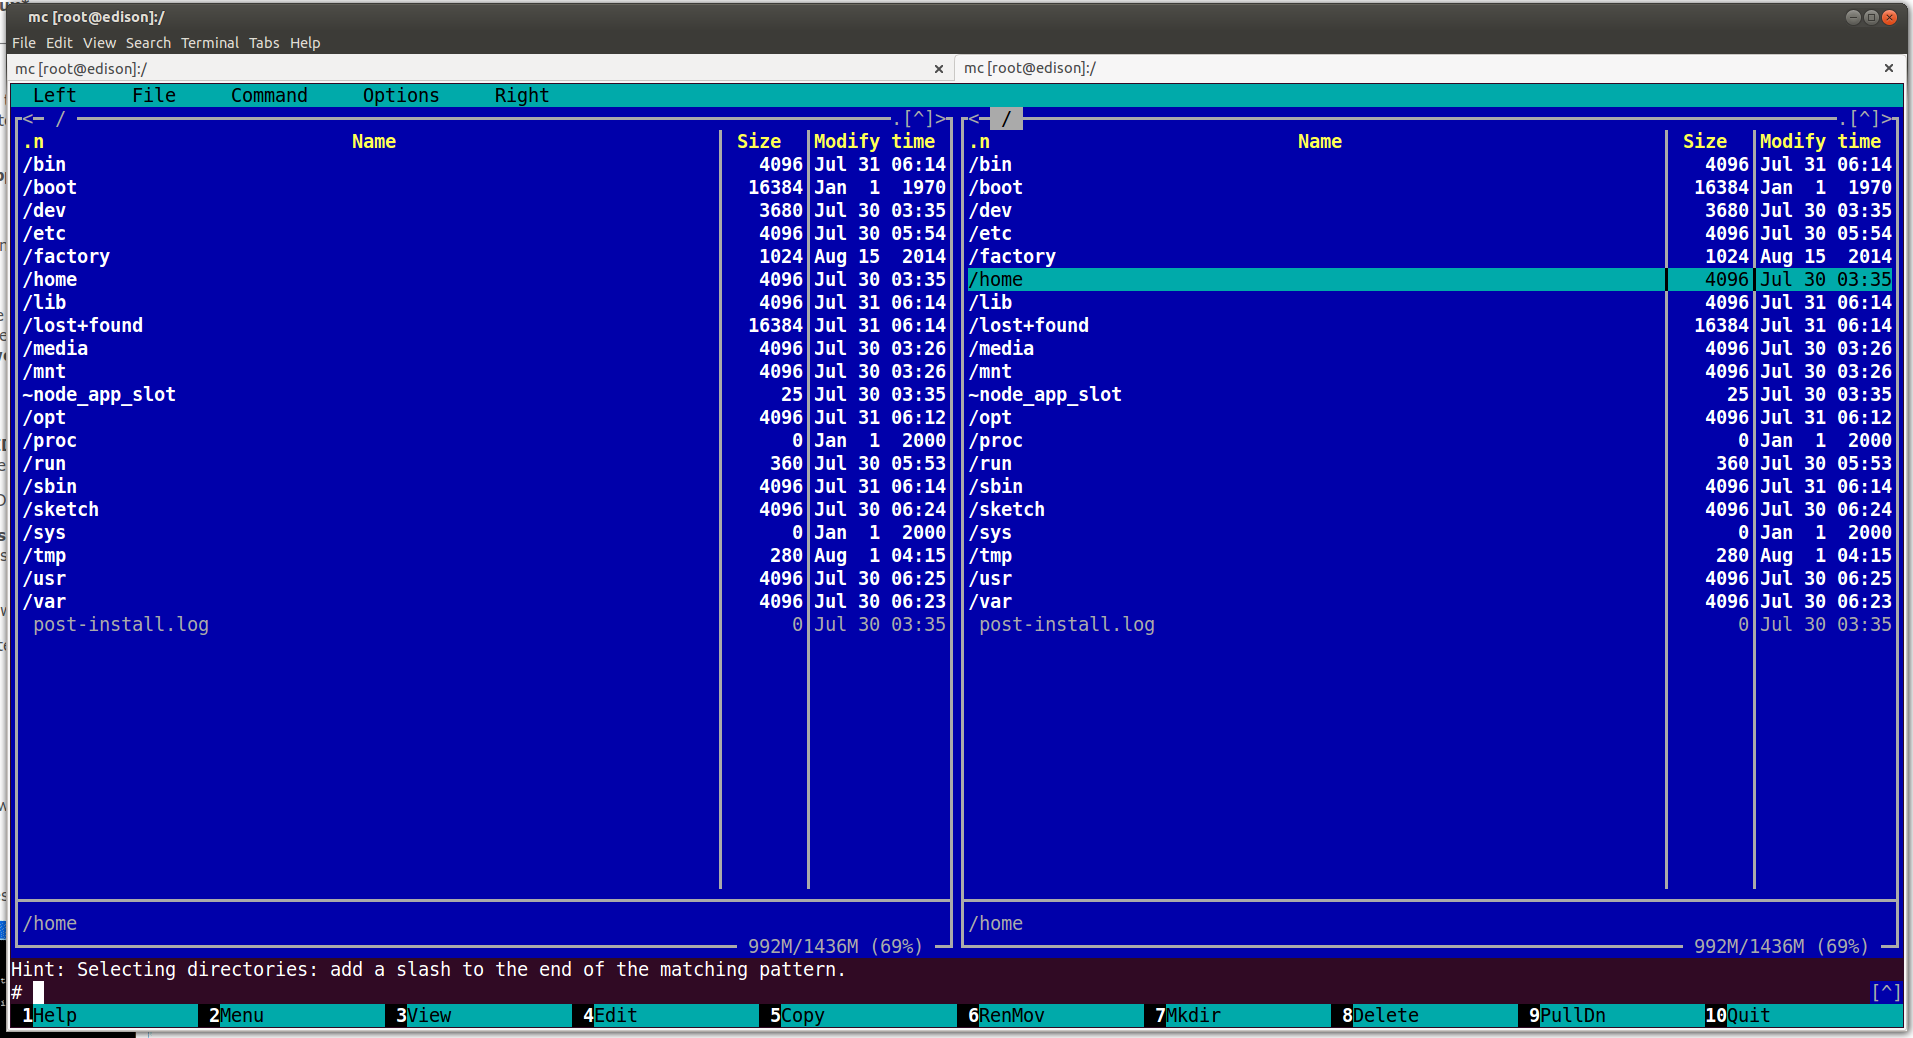
IMAGE_INSTALL_append = " mc"
IMAGE_INSTALL_append = " qtbase qtbase-fonts \
    qtbase-plugins \
    qtbase-tools \
    qtimageformats-plugins"
IMAGE_INSTALL_append_core2-32 = " libft4222"
IMAGE_INSTALL_append_edison = " libft4222"
LICENSE_FLAGS_WHITELIST_append = " ftdi"
GCCVERSION = "4.9%"

PACKAGECONFIG_DISTRO_append_pn-qtbase = " linuxfb icu alsa pulseaudio sql-sqlite"

I modified the file ~/edison/build_edison/conf/bblayers.conf and added the meta-qt5 layer at the end of BBLAYERS.

 
LCONF_VERSION = "6"

BBPATH = "${TOPDIR}"
BBFILES ?= ""

BBLAYERS ?= " \
  ${TOPDIR}/../poky/meta \
  ${TOPDIR}/../poky/meta-intel-edison/meta-intel-arduino \
  ${TOPDIR}/../poky/meta-intel-edison/meta-intel-edison-bsp \
  ${TOPDIR}/../poky/meta-intel-edison/meta-intel-edison-distro \
  ${TOPDIR}/../poky/meta-intel-iot-devkit \
  ${TOPDIR}/../poky/meta-intel-iot-middleware \
  ${TOPDIR}/../poky/meta-java \
  ${TOPDIR}/../poky/meta-oic \
  ${TOPDIR}/../poky/meta-openembedded/meta-filesystems \
  ${TOPDIR}/../poky/meta-openembedded/meta-networking \
  ${TOPDIR}/../poky/meta-openembedded/meta-oe \
  ${TOPDIR}/../poky/meta-openembedded/meta-python \
  ${TOPDIR}/../poky/meta-openembedded/meta-ruby \
  ${TOPDIR}/../poky/meta-openembedded/meta-webserver \
  ${TOPDIR}/../poky/meta-yocto \
  ${TOPDIR}/../poky/meta-yocto-bsp \
  ${TOPDIR}/../poky/meta-qt5 \
  "
BBLAYERS_NON_REMOVABLE ?= " \
  ${TOPDIR}/../poky/meta \
  ${TOPDIR}/../poky/meta-yocto \
  "

Then the usual Edison image compilation stage.
You must insert yourself into the group “dialout” on Linux Ubuntu to have permissions to run the script “flashall.sh”.

cd ~/edison/poky/
source oe-init-build-env ../build_edison/
bitbake edison-image u-boot
../poky/meta-intel-edison/utils/flash/postBuild.sh .
./toFlash/flashall.sh
Qt5 Host cross-platform SDK compilation

I modified the file ~/edison/poky/meta-qt5/recipes-qt/packagegroups/packagegroup-qt5-toolchain-target.bb
and deleted all packages from the list RDEPENDS_${PN} that depend on Qt Quick and Qt Declarative. My list may change in the future.

RDEPENDS_${PN} += " \
    packagegroup-core-standalone-sdk-target \
    libsqlite3-dev \
    qtbase-dev \
    qtbase-fonts \
    qtbase-mkspecs \
    qtbase-plugins \
    qtbase-staticdev \
    qtconnectivity-dev \
    qtconnectivity-mkspecs \
    qtimageformats-dev \
    qtimageformats-plugins \
    qtserialport-dev \
    qtserialport-mkspecs \
    qtsvg-dev \
    qtsvg-mkspecs \
    qtsvg-plugins \
    qtsystems-dev \
    qtsystems-mkspecs \
    qttools-dev \
    qttools-mkspecs \
    qttools-staticdev \
    qttools-tools \
    qtxmlpatterns-dev \
    qtxmlpatterns-mkspecs \
"

I compiled the SDK.

cd ~/edison/poky/
source oe-init-build-env ../build_edison/
bitbake meta-toolchain-qt5

I ran the new SDK installer in ~/edison/build_edison/tmp/deploy/sdk

sh poky-edison-glibc-x86_64-meta-toolchain-qt5-core2-32-toolchain-1.7.3.sh

It installed the SDK into the default folder /opt/poky-edison/1.7.3
I opened the directory /opt/poky-edison/1.7.3/sysroots/x86_64-pokysdk-linux/usr/bin/i586-poky-linux
and created symlinks. Without them, my system compiler and linker in /usr/bin are called instead.

ln -s i586-poky-linux-g++ g++
ln -s i586-poky-linux-cpp cpp
ln -s i586-poky-linux-ld ld
ln -s i586-poky-linux-gdb gdb
Qt Creator IDE installation

I installed Qt Creator from https://download.qt.io/archive/qt/5.3/5.3.2/, as the version of Qt in the Yocto package is 5.3.2.
But, probably, the one from the Linux distribution should work as well.
I installed it in the directory ~/Qt.

I modified the script ~/Qt/Tools/QtCreator/bin/qtcreator.sh, so it will load the environment variables for the SDK. I put the new line at the very top of the script.

source /opt/poky-edison/1.7.3/environment-setup-core2-32-poky-linux
#! /bin/sh

On my Edison I created the user “farit” and added him to the group “video” that has permissions to write to the framebuffer and read input buttons. His home directory on the Edison is “/home/farit”.

usermod -a -G video farit

I modified the menu link on my desktop to run the script ~/Qt/Tools/QtCreator/bin/qtcreator.sh to open Qt Creator.

In Qt Creator, I opened the menu Tools -> Options -> Devices and added my Edison device as “Generic Linux Device”.
I named it “edison” and provided the name and password combination for the user “farit”. Then tested the connection.

I opened the menu Tools > Options > Build & Run.
I opened the tab “Qt Versions”, clicked on the button “Add” and browsed to select qmake

/opt/poky-edison/1.7.3/sysroots/x86_64-pokysdk-linux/usr/bin/qt5/qmake

I opened the tab “Compilers”, clicked on the button “Add”, selected “GCC” and browsed to select gcc

/opt/poky-edison/1.7.3/sysroots/x86_64-pokysdk-linux/usr/bin/i586-poky-linux/i586-poky-linux-gcc

I opened the tab “Debuggers”, clicked on the button “Add” and browsed to select gdb. I named it GDB.

/opt/poky-edison/1.7.3/sysroots/x86_64-pokysdk-linux/usr/bin/i586-poky-linux/i586-poky-linux-gdb

I opened the tab “Kits”, clicked on the button “Add” and filled in the form.
I selected the values for Qt, Compiler, Debugger that I just defined in the previous steps.

Name: edison
Device type: Generic Linux Device
Device: edison
Sysroot: /opt/poky-edison/1.7.3/sysroots/x86_64-pokysdk-linux
Compiler: GCC
Debugger: GDB
Qt Version: Qt 5.3.2

Sample Qt program

I clicked on “New Project” and selected Applications -> Qt Widgets Application.
I named it “testik”.

In testik.pro, I added the path “/home/farit”, where Qt Creator will copy the executable on the Edison.

#-------------------------------------------------
#
# Project created by QtCreator 2016-06-02T14:32:35
#
#-------------------------------------------------

QT       += core gui

greaterThan(QT_MAJOR_VERSION, 4): QT += widgets

TARGET = testik
TEMPLATE = app


SOURCES += main.cpp\
        mainwindow.cpp

HEADERS  += mainwindow.h

FORMS    += mainwindow.ui

target.path = /home/farit
INSTALLS += target

In mainwindow.h, I only added the prototype for the function “keyPressEvent”.

#ifndef MAINWINDOW_H
#define MAINWINDOW_H

#include <QMainWindow>

namespace Ui {
class MainWindow;
}

class MainWindow : public QMainWindow
{
    Q_OBJECT

public:
    explicit MainWindow(QWidget *parent = 0);
    ~MainWindow();

protected:
    void keyPressEvent(QKeyEvent *);

private:
    Ui::MainWindow *ui;
};

#endif // MAINWINDOW_H

main.cpp is the default one

#include "mainwindow.h"
#include <QApplication>

int main(int argc, char *argv[])
{
    QApplication a(argc, argv);
    MainWindow w;
    w.show();

    return a.exec();
}

In mainwindow.cpp, I implemented the function “keyPressEvent”.

#include <QKeyEvent>
#include <QDebug>
#include "mainwindow.h"
#include "ui_mainwindow.h"

MainWindow::MainWindow(QWidget *parent) :
    QMainWindow(parent),
    ui(new Ui::MainWindow)
{
    ui->setupUi(this);
}

MainWindow::~MainWindow()
{
    delete ui;
}

void MainWindow::keyPressEvent(QKeyEvent *event)
{
    if(event->key() == Qt::Key_Up)
    {
        if (event->isAutoRepeat()) {
             ui->myLabel->setText("You auto pressed Up");
        }
        else {
            ui->myLabel->setText("You pressed Up");
        }
    }
    else if(event->key() == Qt::Key_Down)
    {
        ui->myLabel->setText("You pressed Down");
    }
}

In mainwindow.ui, I created a label “myLabel”.
In the MainWindow properties, I clicked on the “palette” button and made the background transparent by setting the opacity to 0 for “Window”. I changed “WindowText” to white by selecting the color #FFFFFF.

In the “Projects” tab in the “Run” section, I added the arguments for the executable, so it can write to the default framebuffer /dev/fb0 and read input from /dev/input/event0.

-platform linuxfb -plugin EvdevKeyboard
Qt test program running

Connecting Buttons to Intel Edison

The Intel Edison has multiple GPIO pins, which can be connected to push buttons.

I use the gpio-keys Linux driver. Each button emits an event, which can be read in the same way as a keyboard event.

Schematic

Here is the schematic of my shield with the push buttons. The buttons are SW2, SW3, SW4, SW5.

Shiled with push buttons for Intel Edison
Shield with Push Buttons for Intel Edison

GPIO pullup code

As you can see, one side of a button is connected to the ground and another to a GPIO pin. I could use external pullup resistors, but the Intel Edison has built-in pullup resistors, which I activated instead. The current kernel code doesn’t have a function for setting a pullup resitor, so I had to write my own.

I added the function lnw_gpio_set_pull_alt into the Linux kernel file drivers/gpio/gpio-langwell.c

void lnw_gpio_set_pull_alt(unsigned gpio, int value, int pullup_value)
{
	struct lnw_gpio *lnw;
	u32 flis_offset;
	u32 flis_value;
	unsigned long flags;

	/* use this trick to get memio */
	lnw = irq_get_chip_data(gpio_to_irq(gpio));
	if (!lnw) {
		pr_err("langwell_gpio: can not find pin %d\n", gpio);
		return;
	}
	if (gpio < lnw->chip.base || gpio >= lnw->chip.base + lnw->chip.ngpio) {
		dev_err(lnw->chip.dev, "langwell_gpio: wrong pin %d to config alt\n", gpio);
		return;
	}
	gpio -= lnw->chip.base;

	if (lnw->type != TANGIER_GPIO) {
		return;
    }

	flis_offset = lnw->get_flis_offset(gpio);
	if (WARN(flis_offset == -EINVAL, "invalid pin %d\n", gpio))
		return -EINVAL;
	if (is_merr_i2c_flis(flis_offset))
		return;

	spin_lock_irqsave(&lnw->lock, flags);
	flis_value = get_flis_value(flis_offset);
	if (value) {
		flis_value |= PULLUP_ENABLE;
		flis_value &= ~PULLDOWN_ENABLE;
	} else {
		flis_value |= PULLDOWN_ENABLE;
		flis_value &= ~PULLUP_ENABLE;
	}
	//flis_value |= PUPD_VAL_50K;
    flis_value |= pullup_value;

	set_flis_value(flis_value, flis_offset);
	spin_unlock_irqrestore(&lnw->lock, flags);
}
EXPORT_SYMBOL_GPL(lnw_gpio_set_pull_alt);

Also added its declaration and the constants for the pullup values into the Linux kernel file include/linux/lnw_gpio.h

#define PUPD_VAL_2K	(0 << 4)
#define PUPD_VAL_20K	(1 << 4)
#define PUPD_VAL_50K	(2 << 4)
#define PUPD_VAL_910	(3 << 4)
void lnw_gpio_set_pull_alt(unsigned gpio, int value, int pullup_value);

I added the definitions for my 4 push buttons into the Linux kernel file arch/x86/platform/intel-mid/device_libs/platform_gpio_keys.c
The buttons are for GPIO12, GPIO13, GPIO182, GPIO183.
Each button configured as a general purpose pin by using the multiplexor code: lnw_gpio_set_alt(gb[i].gpio, LNW_GPIO);
The pullup value is set to 50K using the previously written function: lnw_gpio_set_pull_alt(gb[i].gpio, 1, PUPD_VAL_50K);

/*
 * platform_gpio_keys.c: gpio_keys platform data initilization file
 *
 * (C) Copyright 2008 Intel Corporation
 * Author:
 *
 * This program is free software; you can redistribute it and/or
 * modify it under the terms of the GNU General Public License
 * as published by the Free Software Foundation; version 2
 * of the License.
 */

#include <linux/input.h>
#include <linux/init.h>
#include <linux/kernel.h>
#include <linux/gpio.h>
#include <linux/gpio_keys.h>
#include <linux/platform_device.h>
#include <asm/intel-mid.h>
#include "platform_gpio_keys.h"
#include <linux/lnw_gpio.h>

/*
 * we will search these buttons in SFI GPIO table (by name)
 * and register them dynamically. Please add all possible
 * buttons here, we will shrink them if no GPIO found.
 */
static struct gpio_keys_button gpio_button[] = {
        {
                .code = KEY_POWER,
                .gpio = -1, /* GPIO number */
                .active_low = 1,
                .desc = "power_btn",/*Button description*/
                .type = EV_KEY,
                .wakeup = 0,
                .debounce_interval = 3000,
        },
        {
                .code = KEY_UP,
                .gpio = 182,
                .active_low = 1,
                .desc = "up_btn",
                .type = EV_KEY,
                .wakeup = 0,
                .debounce_interval = 100,
        },
        {
                .code = KEY_DOWN,
                .gpio = 12,
                .active_low = 1,
                .desc = "down_btn",
                .type = EV_KEY,
                .wakeup = 0,
                .debounce_interval = 100,
        },
        {
                .code = KEY_ESC,
                .gpio = 13,
                .active_low = 1,
                .desc = "back_btn",
                .type = EV_KEY,
                .wakeup = 0,
                .debounce_interval = 100,
        },
        {
                .code = KEY_ENTER,
                .gpio = 183,
                .active_low = 1,
                .desc = "down_btn",
                .type = EV_KEY,
                .wakeup = 0,
                .debounce_interval = 100,
        },
};

static struct gpio_keys_platform_data gpio_keys = {
	.buttons	= gpio_button,
	.rep		= 1,
	.nbuttons	= -1, /* will fill it after search */
};

static struct platform_device pb_device = {
	.name		= DEVICE_NAME,
	.id		= -1,
	.dev		= {
		.platform_data	= &gpio_keys,
	},
};

/*
 * Shrink the non-existent buttons, register the gpio button
 * device if there is some
 */
static int __init pb_keys_init(void)
{
	struct gpio_keys_button *gb = gpio_button;
	int i, num, good = 0;

	num = sizeof(gpio_button) / sizeof(struct gpio_keys_button);
	for (i = 0; i < num; i++) {
		pr_info("info[%2d]: name = %s, gpio = %d\n",
			 i, gb[i].desc, gb[i].gpio);
		if (gb[i].gpio == -1)
			continue;

                if (gb[i].gpio > 0) {
                    lnw_gpio_set_alt(gb[i].gpio, LNW_GPIO);
                    lnw_gpio_set_pull_alt(gb[i].gpio, 1, PUPD_VAL_50K);
                }

		if (i != good)
			gb[good] = gb[i];
		good++;
	}

	if (good) {
		gpio_keys.nbuttons = good;
		return platform_device_register(&pb_device);
	}
	return 0;
}
late_initcall(pb_keys_init);
Testing Buttons

When the new Linux kernel was recompiled and flashed to the Intel Edison, I could verify the buttons.

I checked the files in the directory for the GPIO12: /sys/kernel/debug/gpio_debug/gpio12
current_pinmux was mode0
current_pullmode was pullup
current_pullstrength was 50k

I ran the command and tried to push on the buttons. I received some symbols. It meant that the buttons worked.

cat /dev/input/event0

I copied the file evtest.c from http://elinux.org/images/9/93/Evtest.c and compiled it on my Edison.

gcc evtest.c -o evtest

I ran the program evtest and got expected results.

# ./evtest /dev/input/event0
Input driver version is 1.0.1
Input device ID: bus 0x19 vendor 0x1 product 0x1 version 0x100
Input device name: "gpio-keys"
Supported events:
  Event type 0 (Sync)
  Event type 1 (Key)
    Event code 1 (Esc)
    Event code 28 (Enter)
    Event code 103 (Up)
    Event code 108 (Down)
  Event type 20 (Repeat)
Testing ... (interrupt to exit)
Event: time 1465107735.152126, type 1 (Key), code 108 (Down), value 1
Event: time 1465107735.152126, -------------- Report Sync ------------
Event: time 1465107735.344576, type 1 (Key), code 108 (Down), value 0
Event: time 1465107735.344576, -------------- Report Sync ------------
Event: time 1465107743.087594, type 1 (Key), code 103 (Up), value 1
Event: time 1465107743.087594, -------------- Report Sync ------------
Event: time 1465107743.332727, type 1 (Key), code 103 (Up), value 0
Event: time 1465107743.332727, -------------- Report Sync ------------
Event: time 1465107745.988003, type 1 (Key), code 28 (Enter), value 1
Event: time 1465107745.988003, -------------- Report Sync ------------
Event: time 1465107746.187692, type 1 (Key), code 28 (Enter), value 0
Event: time 1465107746.187692, -------------- Report Sync ------------
Event: time 1465107748.336925, type 1 (Key), code 1 (Esc), value 1
Event: time 1465107748.336925, -------------- Report Sync ------------
Event: time 1465107748.552085, type 1 (Key), code 1 (Esc), value 0
Event: time 1465107748.552085, -------------- Report Sync ------------

I may change the event key codes for the buttons. I can get the codes from the same file http://elinux.org/images/9/93/Evtest.c

Accessing /dev/input/event0 as a regular user

By default, the device /dev/input/event0 is accessible only by root.

I created the file /etc/udev/rules.d/input.rules
I chose the group “video” as I will use a user who should be able to access both the video device and the input device.

KERNEL=="event*", NAME="input/%k", MODE="660", GROUP="video"

I also created the file with the same contents poky/meta/recipes-core/systemd/systemd/input.rules
and added it into the recipe poky/meta/recipes-core/systemd/systemd_216.bb

SRC_URI = "git://anongit.freedesktop.org/systemd/systemd;branch=master;protocol=git \
           file://binfmt-install.patch \
           file://systemd-pam-configure-check-uclibc.patch \
           file://systemd-pam-fix-execvpe.patch \
           file://systemd-pam-fix-fallocate.patch \
           file://systemd-pam-fix-mkostemp.patch \
           file://optional_secure_getenv.patch \
           file://uclibc-sysinfo_h.patch \
           file://uclibc-get-physmem.patch \
           file://0001-add-support-for-executing-scripts-under-etc-rcS.d.patch \
           file://0001-missing.h-add-fake-__NR_memfd_create-for-MIPS.patch \
           file://0001-Make-root-s-home-directory-configurable.patch \
           file://0001-systemd-user-avoid-using-system-auth.patch \
           file://0001-journal-Fix-navigating-backwards-missing-entries.patch \
           file://0001-tmpfiles-make-resolv.conf-entry-conditional-on-resol.patch \
           file://0001-build-sys-do-not-install-tmpfiles-and-sysusers-files.patch \
           file://0001-build-sys-configure-the-list-of-system-users-files-a.patch \
           file://touchscreen.rules \
           file://input.rules \
           file://00-create-volatile.conf \
           file://init \
           file://run-ptest \
          "

Linux Framebuffer fbtft with SPI DMA for Intel Edison

When you want to connect a display to the Intel Edison module, you should utilise the existing Linux infrastructure and use a kernel framebuffer driver instead of writing your own screen functions based on Arduino libraries.

The schematics and more technical information about my display and board are in my previous post: Framebuffer fbtft Installation on Intel Edison for OLED Display SSD1322.

At the time of writing the article, the Linux kernel SPI support was broken in the original Intel kernel. So, I used Primiano’s kernel that fixed the SPI support. It works perfectly for me, it may not contain the latest Intel’s modifications. Use it on your own risk.

First, I downloaded the Intel sources from http://iotdk.intel.com/src/3.0/edison/. I extracted them into ~/edison in my home directory and followed the instructions for compiling it.

cd ~/edison/poky/
source oe-init-build-env ../build_edison/
bitbake edison-image u-boot
../poky/meta-intel-edison/utils/flash/postBuild.sh .
./toFlash/flashall.sh

Then I replaced the kernel in ~/edison/poky/linux-kernel by my own, but I kept the directories .git and .meta intact.
I increased the revision number in the variable PR = “r3″ in the file ~/edison/poky/meta-intel-edison/meta-intel-edison-bsp/recipes-kernel/linux/linux-externalsrc.bb
I added my new configuration parameters for fbtft into the file ~/edison/poky/linux-kernel/arch/x86/configs/i386_edison_defconfig

I downloaded the fbtft sources. I created the folder ~/edison/poky/linux-kernel/drivers/video/fbtft and extracted the fbtft sources into the folder.

I added the line in ~/edison/poky/linux-kernel/drivers/video/Kconfig before the line “endmenu”.

source "drivers/video/fbtft/Kconfig"

I added the line in ~/edison/poky/linux-kernel/drivers/video/Makefile

obj-$(CONFIG_FB_TFT)    += fbtft/

Then I edited the file ~/edison/poky/linux-kernel/drivers/video/fbtft/fbtft_device.c

I added the header

#include <linux/spi/intel_mid_ssp_spi.h>

Then I added the description of my display into the list of displays.
Where “reset” uses the number 49 of the GP49 pin, “dc” is GP15.
The pin “led” is GP14 and I use it in my custom initialization code in the file fb_ssd1322.c

It seems that the chip SSD1322 supports speeds only up to 12.5MHz, but the Edison must be able to support speeds up to 25MHz.

{
   .name = "er_oled028",
   .spi = &(struct spi_board_info) {
       .modalias = "fb_ssd1322",
       .max_speed_hz = 12500000,
       .mode = SPI_MODE_3,
       .bus_num = 5,
       .chip_select = 0,
       .controller_data = &(struct intel_mid_ssp_spi_chip) {
           .burst_size = DFLT_FIFO_BURST_SIZE,
           .timeout = DFLT_TIMEOUT_VAL,
           .dma_enabled = true,
        },
        .platform_data = &(struct fbtft_platform_data) {
           .display = {
               .buswidth = 8,
               .backlight = 0,
               .width = 256,
               .height = 64,
           },
           .gpios = (const struct fbtft_gpio []) {
               { "reset", 49 },
               { "dc", 15},
               { "led", 14},
               {},
           },
       }
   }
},

I modified the file ~/edison/poky/linux-kernel/drivers/video/fbtft/fbtft-core.c

--- fbtft-core.c	2015-03-05 02:54:01.000000000 -0800
+++ fbtft-core.c.new	2016-05-30 19:19:21.000000000 -0700
@@ -863,7 +863,7 @@
 	if (txbuflen > 0) {
 		if (dma) {
 			dev->coherent_dma_mask = ~0;
-			txbuf = dmam_alloc_coherent(dev, txbuflen, &par->txbuf.dma, GFP_DMA);
+			txbuf = devm_kzalloc(par->info->device, txbuflen, GFP_DMA | GFP_ATOMIC);
 		} else {
 			txbuf = devm_kzalloc(par->info->device, txbuflen, GFP_KERNEL);
 		}

I added the lines to the file ~/edison/poky/meta-intel-edison/meta-intel-edison-bsp/conf/machine/edison.conf to autoload the fbtft module.
Where busnum=5 is the SPI bus number on the Edison.,
name=er_oled028 defines my oled display from fbtft_device.c,
debug=7 shows more debugging information. It’s optional.

KERNEL_MODULE_AUTOLOAD += "fbtft_device"
module_conf_fbtft_device = "options fbtft_device name=er_oled028 busnum=5 debug=7"
KERNEL_MODULE_PROBECONF += "fbtft_device"

Then I recompiled the kernel and flashed my Edison.

I compiled mplayer on the Edison and played a sample video. I couldn’t find a video with the same dimensions as my display, but it should work in the full-screen mode too.

/usr/local/bin/mplayer -vo fbdev ultra.mp4
Downloads

Linux kernel for Edison with SPI DMA fixes and fbtft framebuffer

Framebuffer fbtft Installation on Intel Edison for OLED Display SSD1322

Update: the version with working SPI DMA

The Intel Edison doesn’t have a video interface; so, you connect an OLED or TFT LCD display via the SPI interface using the Linux kernel video module framebuffer.

I used fbtft – Linux Framebuffer drivers for small TFT LCD display modules by Noralf Tronnes.

My display is 2.8″ OLED Display 256×64 Graphic Module SSD1322.

After reading the documentation for the display, I connected it to the Edison via the 4-wire SPI interface, which requires an additional GPIO pin for the D/C signal (Write Data/Write Command). The 3-wire SPI interface uses the 9 bit SPI interface and should be avoided.

I compared the timing diagrams for the SSD1322 chip with the SPI Transfer Modes and found that it uses the SPI Mode 3.

Schematic

Here is the schematic of my SSD1322 shield for the Intel Edison.

SSD1322 Shield for Intel Edison
The SSD1322 Display Shield for the Intel Edison
Connections between the Edison and the Display:

GP49 -> RES(Reset Signal Input)
GP15 -> D/C(Data/Command Control)
GP110_SPI_2_FS0(CS0) -> CS(Chip Select Input)
GP109_SPI_2_CLK -> D0/SCLK(Serial Clock)
GP115_SPI_2_TXD -> D1/SDIN(Serial Data Input)
I also connected GP14 to the SHDN pin of the +12V voltage regulator.

fbtft download and configuration

The latest code from the notro/fbtft repository didn’t work for me.
I used the older code presslab-us/fbtft, which also included support for my chip SSD1322.

I prepared the Edison directory with the Linux sources as described in my article Building Yocto Linux for Intel Edison.

After I compiled the Edison image for the first time, I copied these two hidden directories into another folder (I placed the Edison sources into the “edison” directory in my home directory); so, I can return the sources to the original state by copying these hidden directories back at any moment.

~/edison/edison-src/build/tmp/work/edison-poky-linux/linux-yocto/3.10.17-r0/linux/.git
~/edison/edison-src/build/tmp/work/edison-poky-linux/linux-yocto/3.10.17-r0/linux/.meta

I created the directory “fbtft” and copied all fbtft files there.

mkdir ~/edison/edison-src/build/tmp/work/edison-poky-linux/linux-yocto/3.10.17-r0/linux/drivers/video/fbtft

I added the line in ~/edison/edison-src/build/tmp/work/edison-poky-linux/linux-yocto/3.10.17-r0/linux/drivers/video/Kconfig before the line “endmenu”.

source "drivers/video/fbtft/Kconfig"

I added the line in ~/edison/edison-src/build/tmp/work/edison-poky-linux/linux-yocto/3.10.17-r0/linux/drivers/video/Makefile

obj-$(CONFIG_FB_TFT)    += fbtft/

Then I edited the file ~/edison/edison-src/build/tmp/work/edison-poky-linux/linux-yocto/3.10.17-r0/linux/drivers/video/fbtft/fbtft_device.c

I added the header

#include <linux/spi/intel_mid_ssp_spi.h>

Then I added the description of my display into the list of displays.
Where “reset” uses the number 49 of the GP49 pin, “dc” is GP15.
The pin “led” is GP14 and I use it in my custom initialization code in the file fb_ssd1322.c

DMA has to be disabled because the DMA code in intel_mid_ssp_spi.h is broken.
If you enable it, you can see errors like this: “intel_mid_ssp_spi_unified 0000:00:07.1: ERROR : DMA buffers already mapped”

{
   .name = "er_oled028",
   .spi = &(struct spi_board_info) {
       .modalias = "fb_ssd1322",
       .max_speed_hz = 12000000,
       .mode = SPI_MODE_3,
       .bus_num = 5,
       .chip_select = 0,
       .controller_data = &(struct intel_mid_ssp_spi_chip) {
           .burst_size = DFLT_FIFO_BURST_SIZE,
           .timeout = DFLT_TIMEOUT_VAL,
           .dma_enabled = false,
        },
        .platform_data = &(struct fbtft_platform_data) {
           .display = {
               .buswidth = 8,
               .backlight = 0,
               .width = 256,
               .height = 64,
           },
           .gpios = (const struct fbtft_gpio []) {
               { "reset", 49 },
               { "dc", 15},
               { "led", 14},
               {},
           },
       }
   }
},

I wrote my custom initialization code for the display ER_OLED028 in fb_ssd1322.c following the documentation for my display.

static int init_display(struct fbtft_par *par)
{
   fbtft_par_dbg(DEBUG_INIT_DISPLAY, par, "%s()\n", __func__);

   //reset the chip
   mdelay(5);
   fbtft_par_dbg(DEBUG_RESET, par, "%s()\n", __func__);
   gpio_set_value(par->gpio.reset, 0);
   udelay(200);
   gpio_set_value(par->gpio.reset, 1);
   udelay(200);

   write_reg(par, 0xfd, 0x12); /* Unlock OLED driver IC */
   write_reg(par, 0xae); /* Display Off */
   write_reg(par, 0xb3, 0x91); /* Display divide clockratio/frequency */
   write_reg(par, 0xca, 0x3f); /* Multiplex ratio, 1/64, 64 COMS enabled */
   write_reg(par, 0xa2, 0x00); /* Set offset, the display map starting line is COM0 */
   write_reg(par, 0xa1, 0x00); /* Set start line position */
   write_reg(par, 0xa0, 0x14, 0x11); /* Set remap, horiz address increment, disable colum address remap, */
				                      /*  enable nibble remap, scan from com[N-1] to COM0, disable COM split odd even */
   write_reg(par, 0xb5, 0x00); /* Set GPIO */
   write_reg(par, 0xab, 0x01); /* Select internal VDD */
   write_reg(par, 0xb4, 0xa0, 0xfd); /* Display enhancement A, external VSL, enhanced low GS display quality */
   write_reg(par, 0xc1, 0xff); /* Contrast current, 256 steps, default is 0x7F */
   write_reg(par, 0xc7, 0x0f); /* Master contrast current, 16 steps, default is 0x0F */
   write_reg(par, 0xb1, 0xe2); /* Phase Length */
   write_reg(par, 0xd1, 0x82, 0x20); /* Display enhancement B */
   write_reg(par, 0xbb, 0x1f); /* Pre-charge voltage */
   write_reg(par, 0xb6, 0x08); /* Set Second Pre-Charge Period */
   write_reg(par, 0xbe, 0x07); /* Set VCOMH */
   write_reg(par, 0xa6); /* Normal display */

   //enable VCC
   gpio_set_value(par->gpio.led[0], 1);
   mdelay(100);
  
   write_reg(par, 0xaf); /* Display ON */

   return 0;
}

After all modifications, I created a patch file.
While committing to git, I added the comment line “fbtft_ssd1322″.

cd ~/edison/edison-src/build/tmp/work/edison-poky-linux/linux-yocto/3.10.17-r0/linux/drivers/video
git add .
git commit
git format-patch -1

It created the patch file “0001-fbtft_ssd1322.patch”. I renamed it to “fbtft_ssd1322.patch” and copied it to:

~edison/edison-src/meta-intel-edison/meta-intel-edison-bsp/recipes-kernel/linux/files/

I created the kernel configuration file fbtft.cfg in the same directory “recipes-kernel/linux/files/”:

CONFIG_FRAMEBUFFER_CONSOLE=m
CONFIG_FRAMEBUFFER_CONSOLE_DETECT_PRIMARY=m
CONFIG_FB_SYS_FILLRECT=y
CONFIG_FB_SYS_COPYAREA=y
CONFIG_FB_SYS_IMAGEBLIT=y
CONFIG_FB_SYS_FOPS=y
CONFIG_FB_DEFERRED_IO=y
CONFIG_FB_BACKLIGHT=y
CONFIG_FB_TFT=m
# CONFIG_FB_TFT_GU39XX is not set
# CONFIG_FB_TFT_HX8340BN is not set
# CONFIG_FB_TFT_HX8347D is not set
# CONFIG_FB_TFT_ILI9320 is not set
# CONFIG_FB_TFT_ILI9325 is not set
# CONFIG_FB_TFT_ILI9341 is not set
# CONFIG_FB_TFT_PCD8544 is not set
# CONFIG_FB_TFT_SSD1289 is not set
# CONFIG_FB_TFT_SSD1351 is not set
CONFIG_FB_TFT_SSD1322=m
# CONFIG_FB_TFT_ST7735R is not set
# CONFIG_FB_FLEX is not set
CONFIG_FB_TFT_FBTFT_DEVICE=m
# CONFIG_TOUCHSCREEN_ADS7846_DEVICE is not set

I commented the line in the file board.c for the device ads7955 that occupies the same SPI busnum=5, cs=0 that we use for the display.
Then I ran the same git sequence to generate the patch file “platform_ssd1322.patch” and copied it into the same “recipes-kernel/linux/files” directory.

From c83f14b37bc2dcfa97b36214f02b15ddaad51a47 Mon Sep 17 00:00:00 2001
From: Farit <farit@example.com>
Date: Sat, 9 Apr 2016 22:02:19 -0700
Subject: [PATCH] platform_ssd1322

---
 arch/x86/platform/intel-mid/board.c | 2 +-
 1 file changed, 1 insertion(+), 1 deletion(-)

diff --git a/arch/x86/platform/intel-mid/board.c b/arch/x86/platform/intel-mid/board.c
index eb3d8a4..fca6440 100644
--- a/arch/x86/platform/intel-mid/board.c
+++ b/arch/x86/platform/intel-mid/board.c
@@ -111,7 +111,7 @@ struct devs_id __initconst device_ids[] = {
 
 	/* SPI devices */
 	{"spidev", SFI_DEV_TYPE_SPI, 0, &spidev_platform_data, NULL},
-	{"ads7955", SFI_DEV_TYPE_SPI, 0, &ads7955_platform_data, NULL},
+//	{"ads7955", SFI_DEV_TYPE_SPI, 0, &ads7955_platform_data, NULL},
 	{"bma023", SFI_DEV_TYPE_I2C, 1, &no_platform_data, NULL},
 	{"pmic_gpio", SFI_DEV_TYPE_SPI, 1, &pmic_gpio_platform_data, NULL},
 	{"pmic_gpio", SFI_DEV_TYPE_IPC, 1, &pmic_gpio_platform_data,
-- 
1.9.1

When all patch and configuration files were ready, I added links to them into the file “~/edison/edison-src/meta-intel-edison/meta-intel-edison-bsp/recipes-kernel/linux/linux-yocto_3.10.bbappend”.

SRC_URI += "file://defconfig"
SRC_URI += "file://upstream_to_edison.patch"

SRC_URI += "file://fbtft.cfg"
SRC_URI += "file://fbtft_ssd1322.patch"
SRC_URI += "file://platform_ssd1322.patch"
fbtft Module Compilation

Then I recompiled the Linux image and installed it.

cd ~/edison/edison-src
source poky/oe-init-build-env
bitbake edison-image
~/edison/edison-src/meta-intel-edison/utils/flash/postBuild.sh
~/edison/edison-src/build/toFlash/flashall.sh
Loading and Testing the Framebuffer Module

I loaded the fbtft module supplying the name of the display and the SPI bus number (it’s 5 on the Edison).

modprobe fbtft_device name=er_oled028 busnum=5

Sometimes, it’s not loaded. I need to investigate the problems.
When it loads, the “dmesg” command shows:

[   32.254181] fbtft_device:  GPIOS used by 'er_oled028':
[   32.254205] fbtft_device:    'reset' = GPIO49
[   32.254221] fbtft_device:    'dc' = GPIO15
[   32.254234] fbtft_device:    'led' = GPIO14
[   32.254246] fbtft_device:  SPI devices registered:
[   32.254264] fbtft_device:      spidev spi5.1 25000kHz 8 bits mode=0x00
[   32.254281] fbtft_device:      fb_ssd1322 spi5.0 12500kHz 8 bits mode=0x03
[   32.394493] graphics fb0: fb_ssd1322 frame buffer, 256x64, 32 KiB video memory, 8 KiB buffer memory, fps=20, spi5.0 at 12 MHz

Then I can test the module by sending random values to the framebuffer socket “/dev/fb0″.

cat /dev/urandom > /dev/fb0

Here is the result.

Sending Random Data to the Framebuffer

I can also load the fbcon module to display the console on the display.

modprobe fbcon
Edison Console via the Framebuffer
Improvements

There are patches on the Edison forum that may help to fix the DMA issue. Otherwise, the display will be relatively slow.
Check this link stewart maguire’s patches for DMA and FBTFT support.
And this Intel MID SSP SPI driver getting stuck in kernel space.

Downloads

Configuration and patch files for fbtft on Intel Edison

Building Yocto Linux for Intel Edison

The Intel Edison board is shipped with the Yocto Linux distribution installed. Yocto allows an experienced developer to compile a small-size Linux image with only the selected packages. Then the image is flashed into the board. It’s not as convenient as Ubuntu as there are no pre-compiled packages that are easy to install.

I wanted to add the program mc (Midnight Commander); so, I had to recompile the Yocto image. My computer OS is Linux Ubuntu 14.04. I experienced a few problems while compiling; so, I’ll describe them here.

The main document is Board Support Package (BSP) User Guide. I followed it.

Installed the prerequisite packages with the following command:

sudo apt-get install build-essential git diffstat gawk chrpath texinfo libtool \
gcc-multilib dfu-util u-boot-tools

Set up my git name and email:

git config --global user.name "YOUR NAME"
git config --global user.email "YOUR EMAIL ADDRESS"

Downloaded the package Linux source files from the Intel Edison Software Downloads page. At the time of writing, it was in the section Intel Edison® Board Firmware Software Release 2.1.

I install everything related to the Intel Edison into the directory /home/farit/edison. The Linux sources consume 11G in that directory.

Decompressed the source package:

tar xzf edison-src-ww25.5-15.tgz  -C /home/farit/edison/
cd /home/farit/edison/edison-src/

Moved my download and build cache (also called sstate) directories from the default location under the build directory, using the –dl_dir and –sstate_dir options. To create download and sstate directory, used the mkdir command:

mkdir /home/farit/edison/bitbake_download_dir
mkdir /home/farit/edison/bitbake_sstate_dir

Used the setup.sh script to initialize the build environment for Intel Edison.

/home/farit/edison/edison-src/meta-intel-edison/setup.sh \
--dl_dir=/home/farit/edison/bitbake_download_dir \
--sstate_dir=/home/farit/edison/bitbake_sstate_dir \
--build_dir=/home/farit/edison/edison-src

After the setup, I ran these commands recommended by the setup script:

cd /home/farit/edison/edison-src
source poky/oe-init-build-env
bitbake edison-image

The compilation took 5 or so hours. I should’ve used the SSD disk. But most files have been downloaded and cached now; so, it doesn’t take much time the second time.

Then I decided to compile in Midnight Commander. I checked the name of the package on the Yocto recipes directory. It was “mc”.
I opened the file /home/farit/edison/edison-src/meta-intel-edison/meta-intel-edison-distro/recipes-core/images/edison-image.bb and added the lines at the bottom:

#Midnight Commander
IMAGE_INSTALL += "mc"

Then ran again:

cd /home/farit/edison/edison-src
source poky/oe-init-build-env
bitbake edison-image

Then I created a new Linux image:

/home/farit/edison/edison-src/meta-intel-edison/utils/flash/postBuild.sh
/home/farit/edison/edison-src/build/toFlash/flashall.sh

At first, the command complained about the non-existing mkimage program, which is in the package u-boot-tools:

Error : ota_update.scr creation failed, mkimage tool not found

I added a symlink to mkimage and ran the postBuild.sh script again:

cd /home/farit/edison/edison-src
mkdir -p u-boot/tools
cd u-boot/tools
ln -s /usr/bin/mkimage mkimage

When there were no errors, I looked in the directory /home/farit/edison/edison-src/build/toFlash. It contained the same files as in the Intel’s firmware image.
I ran the command flashall.sh in it as root. I added myself into the group “dialout”; so, I should be able to connect to a USB port as a regular user. I’ll check it again the next time.

Midnight Commander on Intel Edison

By default, the subshell (Ctrl-O) doesn’t work in Midnight Commander as it requires bash. Change your user shell from the default “/bin/sh” to “/bin/bash” in /etc/passwd.

When I want to quickly recompile just the kernel after changes, I run these commands:

cd /home/farit/edison/edison-src
source poky/oe-init-build-env
bitbake -f linux-yocto